
How to Install and Configure OpenWRT on the YunCore AX835 Ceiling Access Point: Complete Guide

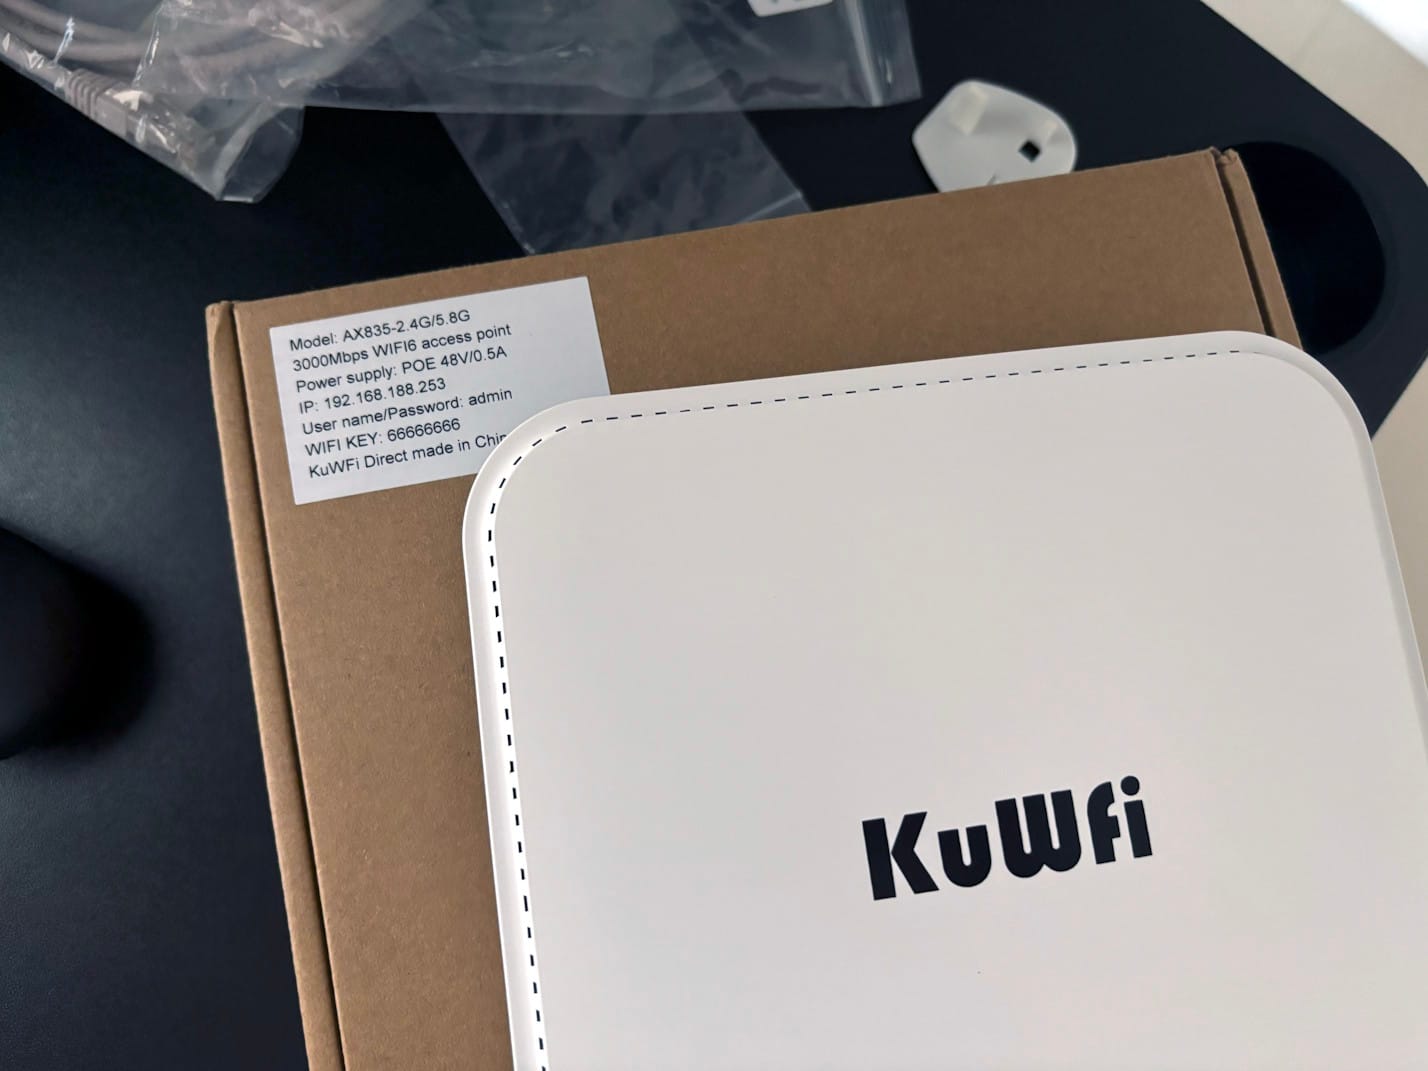
The YunCore AX835 is an affordable ceiling access point featuring high-end Wi-Fi 6 technology (Filogic 820 / MT7976C chipset) at a remarkably low price point of $50-60. Available on platforms like Aliexpress under brands such as KuWfi, this OEM device offers exceptional value for network enthusiasts looking to extend their Wi-Fi coverage.

This comprehensive guide will walk you through installing OpenWRT on the YunCore AX835 and configuring it as a dumb access point to seamlessly extend your Wi-Fi network via ethernet backhaul.
What you'll achieve
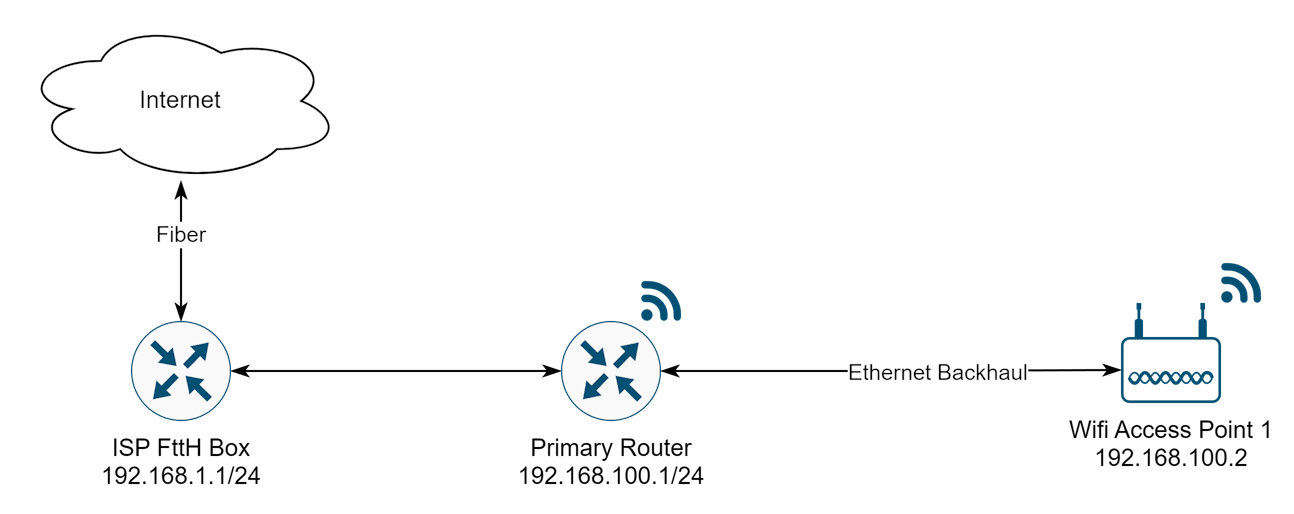
By the end of this tutorial, you'll have a fully functional access point connected to your main router via ethernet, allowing you to extend your Wi-Fi coverage to areas far from your main router. This setup is scalable – you can add as many access points as needed to cover your entire space.
Initial OpenWRT Installation Process
Step 1: Connect to the Default OEM Interface
- Connect an ethernet cable from your computer to the LAN port of the AP
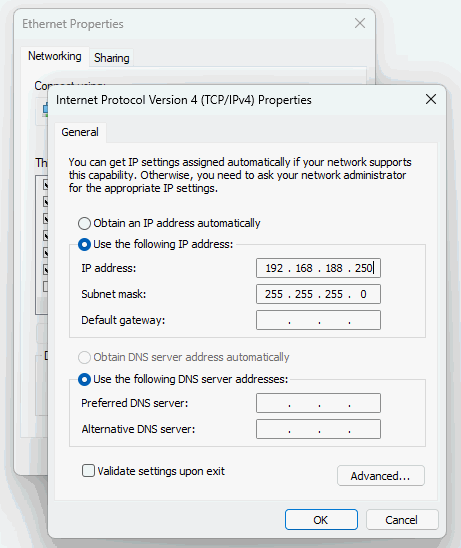
- Configure a static IP address on your computer in the 192.168.188.x range (e.g., 192.168.188.250)
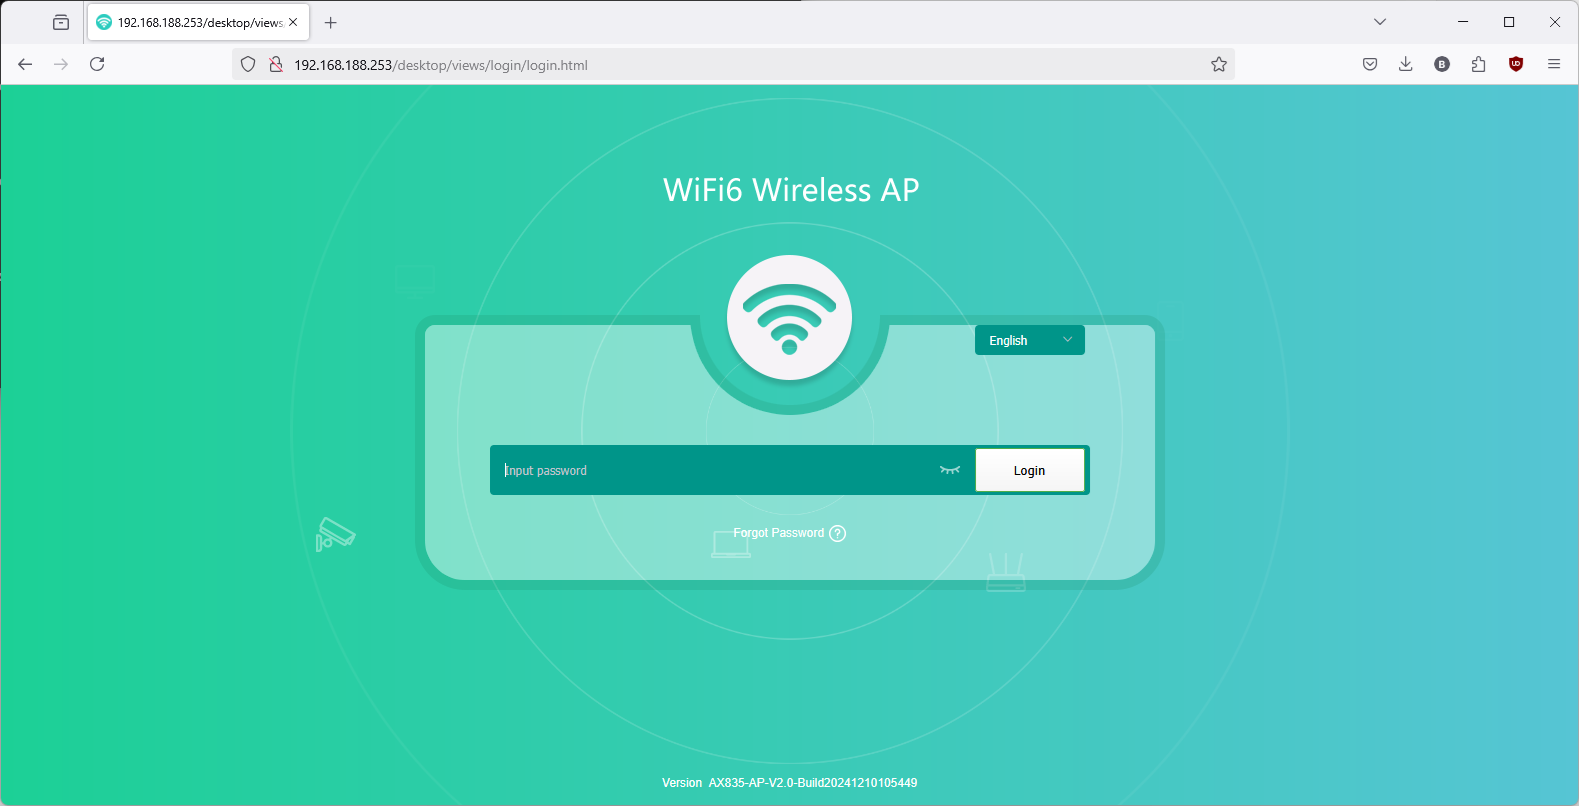
- Access the default interface by navigating to http://192.168.188.253 in your browser
- Log in with the default password "admin" as indicated on the product box
Step 2: Flash OpenWRT to the Device
- Download the sysupgrade image for YunCore AX835 from the OpenWRT website
- Rename the file extension from .bin to .ubin (e.g., rename openwrt-xxx-mediatek-filogic-yuncore_ax835-squashfs-sysupgrade.bin to openwrt-24.10.0-mediatek-filogic-yuncore_ax835-squashfs-sysupgrade.ubin)
- Navigate to Manage → Upgrade in the OEM interface
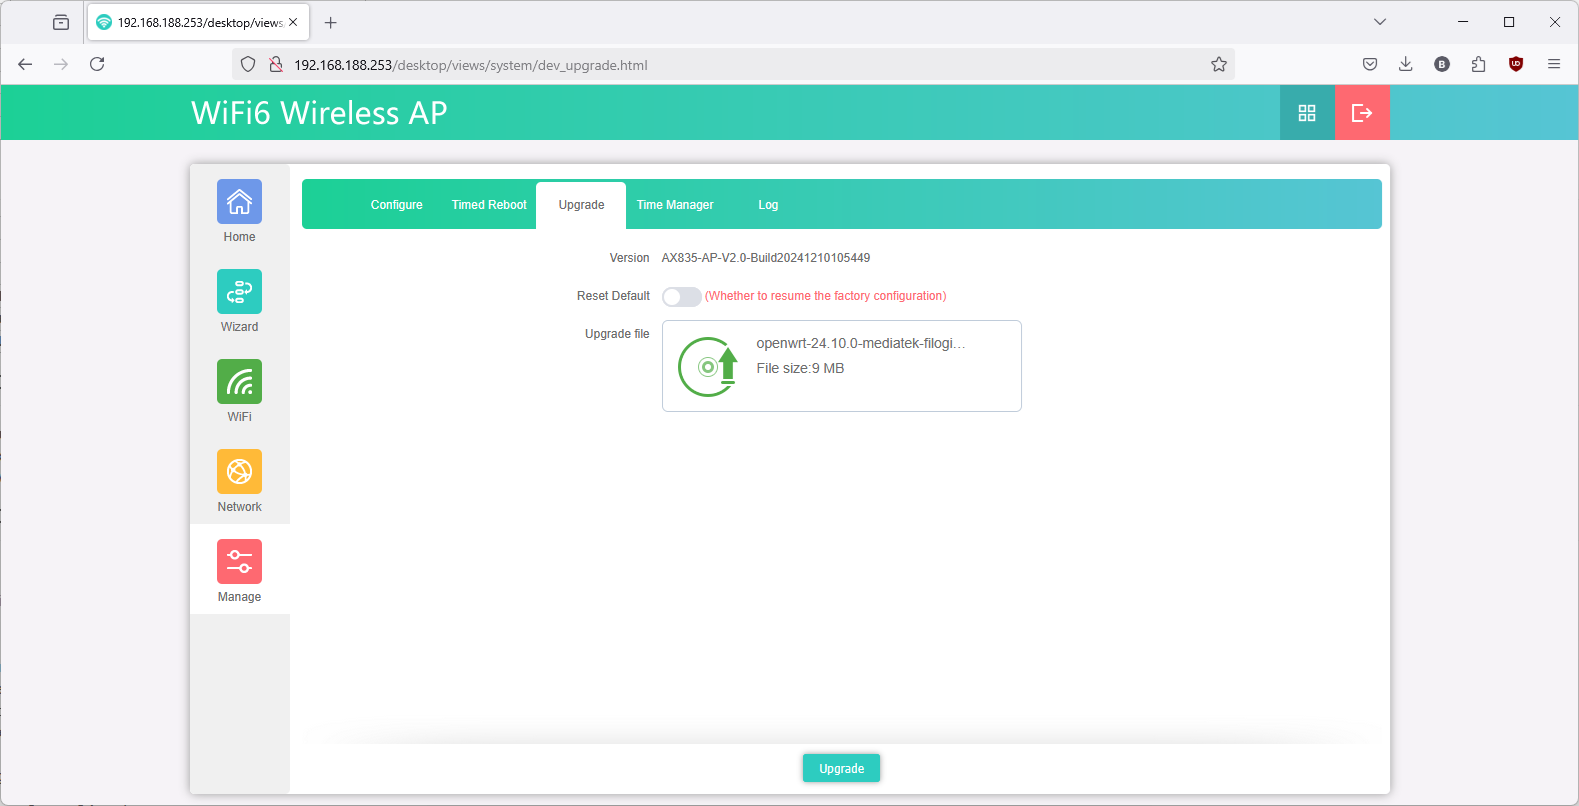
- Drag and drop the renamed OpenWRT image file
- Wait at least 5 minutes for the installation to complete (the interface timer is set to 180 seconds, but it's safer to wait longer)
Troubles begin: getting UART involved
Why UART Access is Necessary
After installing OpenWRT, you may find the device is inaccessible through normal means. The default network configuration prevents connection through either the LAN or WAN ports, effectively soft-bricking the device.
You would think you could just connect to the LAN port using a fixed IP in the 192.168.1.x range (OpenWRT's default) and start setting up the machine? Try again.
It seems the default network configuration that comes with OpenWRT on the Yuncore 835 is just not going to let you do this.
No matter if you connect though the LAN or WAN port, fixed IP, nothing comes up. The device is effectively soft-bricked.
Accessing the Device via UART
Unfortunately, that leaves us with not other option than to open up the device and plug in a UART.
- Open the device to access the UART pins (clearly visible with a non-populated 0.1" header)
- Solder a header to the board (note: the ground pin requires a very hot iron as it connects to the entire ground plane)
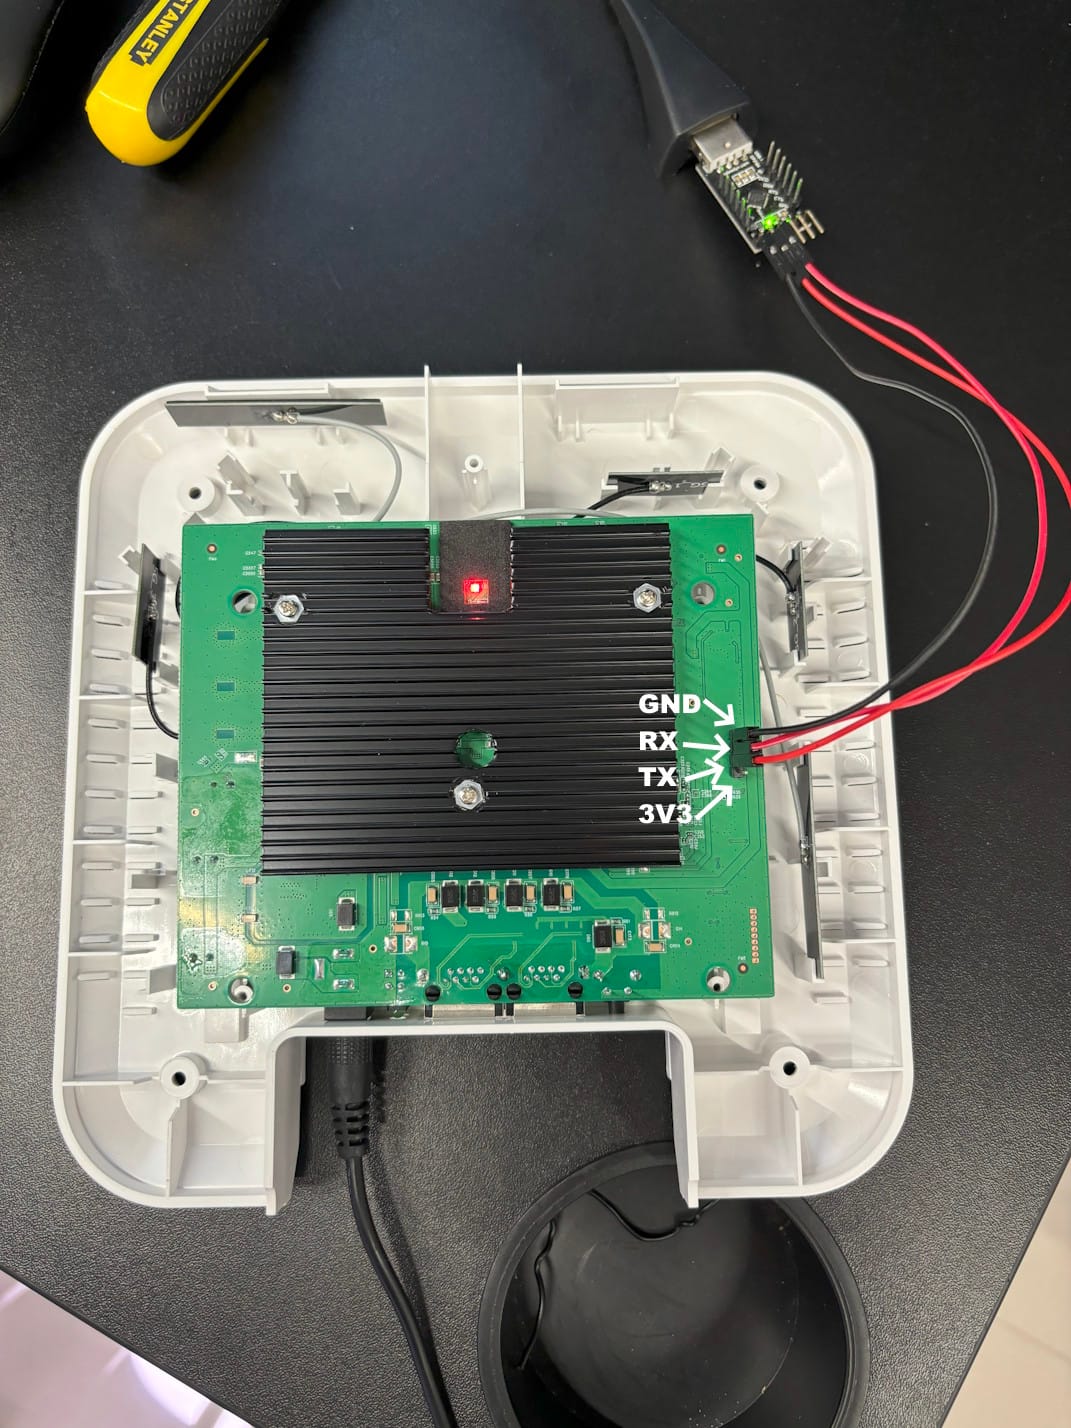
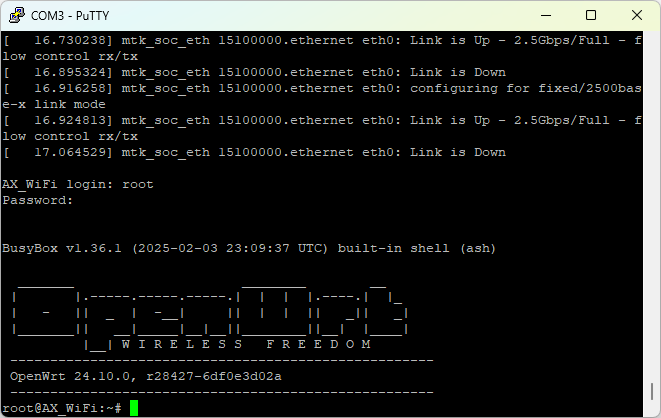
- Connect to the serial port with 115200 baud rate
- You should now see the OpenWRT boot menu
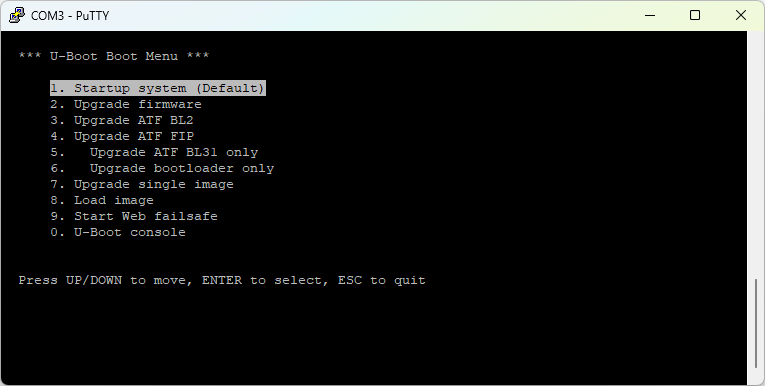
Changing root password
Now that we have access to the device we can finally proceed to configure it.
- From the boot menu, select option 1 (Startup system)
- Enter failsafe mode by pressing 'f' when prompted during boot (timing is critical)
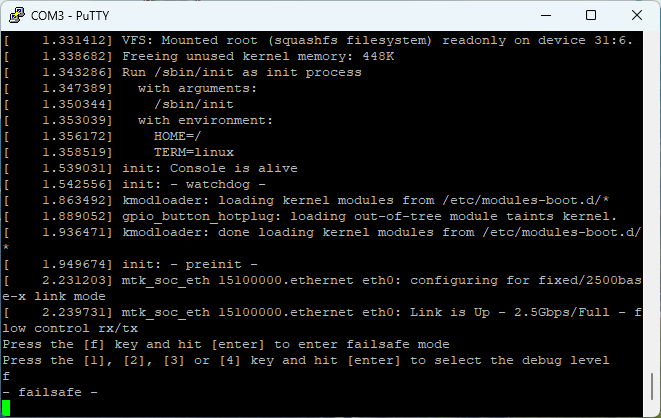
- Once in failsafe mode, execute these commands:
mount_root
passwd
- Set a new password for the root user
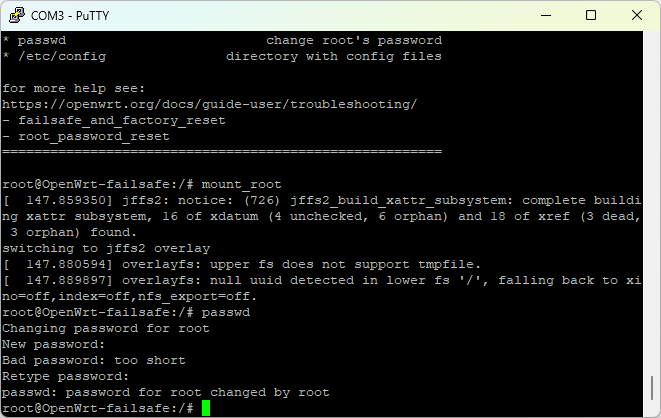
- Reboot the device with the
rebootcommand - You should now be able to log in with your new password
OpenWRT Configuration
Configuration as an Access Point with Ethernet Backhaul
Backing Up Default Configurations
Before making changes, back up the original configuration files:
cp /etc/config/network /etc/config/network.backup
cp /etc/config/wireless /etc/config/wireless.backup
Now open with vi the default network configuration, it should look like this:
config interface 'loopback'
        option device 'lo'
        option proto 'static'
        option ipaddr '127.0.0.1'
        option netmask '255.0.0.0'

config globals 'globals'
        option ula_prefix 'fd64:5915:2e68::/48'

config device
        option name 'br-lan'
        option type 'bridge'
        list ports 'eth0.1'

config device
        option name 'eth0.1'
        option macaddr '7c:27:3c:63:30:74'

config interface 'lan'
        option device 'br-lan'
        option proto 'static'
        option ipaddr '192.168.1.1'
        option netmask '255.255.255.0'
        option ip6assign '60'

config device
        option name 'eth0.2'
        option macaddr '7c:27:3c:63:30:75'

config interface 'wan'
        option device 'eth0.2'
        option proto 'none'

config switch
        option name 'switch0'
        option reset '1'
        option enable_vlan '1'

config switch_vlan
        option device 'switch0'
        option vlan '1'
        option ports '0 1 2 3 6t'

config switch_vlan
        option device 'switch0'
        option vlan '2'
        option ports '4 6t'
Modifying Network Configuration
The default network configuration needs several changes to function as a dumb access point:
- Move the WAN port to the LAN: Add WAN port to the bridge configuration
- Configure ports on the same VLAN: Modify switch_vlan config to put all ports on the same VLAN
- Assign an appropriate IP address: Set an IP in the range of your main router
Move the WAN port to the LAN
We can see that the default config defines eth0.1 for the LAN and eth0.2 for the WAN.
config device
        option name 'br-lan'
        option type 'bridge'
        list ports 'eth0.1'
        list ports 'eth0.2'
        list ports 'wan'

config device
        option name 'eth0.1'
        option macaddr '7c:27:3c:63:30:74'

config device
        option name 'eth0.2'
        option macaddr '7c:27:3c:63:30:75'

config device
        option name 'wan'
        option macaddr '7c:27:3c:63:30:75'
For this, under the lan bridge, we list the ports eth0, 1 and wan, and redefine them under. Do note that your mac addresses will not be the same.
Move all ports to the same VLAN switch
Here I simply comment out one of the switch_vlan config, and move all the ports under the same config.
config switch
        option name 'switch0'
        option reset '1'
        option enable_vlan '1'

#config switch_vlan
#       option device 'switch0'
#       option vlan '1'
#       option ports '0 1 2 3 6t'

config switch_vlan
        option device 'switch0'
        option vlan '2'
        option ports '0 1 2 3 4 6t'
Assign an IP to the access point
Under lan, you need to set an IP address in the range of your main router. My main router sits on the 192.168.100.0/24 network, and has the IP 192.168.100.1; so I set this access point to be on 192.168.100.2. Adapt this to your context.
config interface 'lan'
        option device 'br-lan'
        option proto 'static'
        option ipaddr '192.168.100.2'
        option netmask '255.255.255.0'
        option ip6assign '60'
        option gateway '192.168.100.1'
        list dns '192.168.100.1'
Final configuration
The final configuration looks like below:
config interface 'loopback'
        option device 'lo'
        option proto 'static'
        option ipaddr '127.0.0.1'
        option netmask '255.0.0.0'

config globals 'globals'
        option ula_prefix 'fd64:5915:2e68::/48'

config device
        option name 'br-lan'
        option type 'bridge'
        list ports 'eth0.1'
        list ports 'eth0.2'
        list ports 'wan'

config device
        option name 'eth0.1'
        option macaddr '7c:27:3c:63:30:74'

config device
        option name 'eth0.2'
        option macaddr '7c:27:3c:63:30:75'

config device
        option name 'wan'
        option macaddr '7c:27:3c:63:30:75'

config interface 'lan'
        option device 'br-lan'
        option proto 'static'
        option ipaddr '192.168.100.2'
        option netmask '255.255.255.0'
        option ip6assign '60'
        option gateway '192.168.100.1'
        list dns '192.168.100.1'


config switch
        option name 'switch0'
        option reset '1'
        option enable_vlan '1'

#config switch_vlan
#       option device 'switch0'
#       option vlan '1'
#       option ports '0 1 2 3 6t'

config switch_vlan
        option device 'switch0'
        option vlan '2'
        option ports '0 1 2 3 4 6t'
Disable unneeded services
Since the main router will handle DHCP, DNS, and firewall functions, disable these services on the access point:
service dnsmasq disable
service dnsmasq stop
service odhcpd disable
service odhcpd stop
service firewall disable
service firewall stop
As per the OpenWRT documentation, add these commands to /etc/rc.local to ensure they remain disabled after firmware updates:
# these services do not run on dumb APs
for i in firewall dnsmasq odhcpd; do
  if /etc/init.d/"$i" enabled; then
    /etc/init.d/"$i" disable
    /etc/init.d/"$i" stop
  fi
done
IPv6 (Optional)
Embrace IPv6 by adding this section to your configuration:
config interface 'lan6'
        option proto 'dhcpv6'
        option ifname '@lan'
        option reqprefix 'no'
Switching to Luci
Wifi Setup
Connecting to Your Network
- Connect an ethernet cable from the WAN port of the access point to a LAN port on your main router
- Restart the network service:
service network restart
- Access the LuCI web interface by navigating to the IP address you assigned to the access point (e.g., 192.168.100.2)
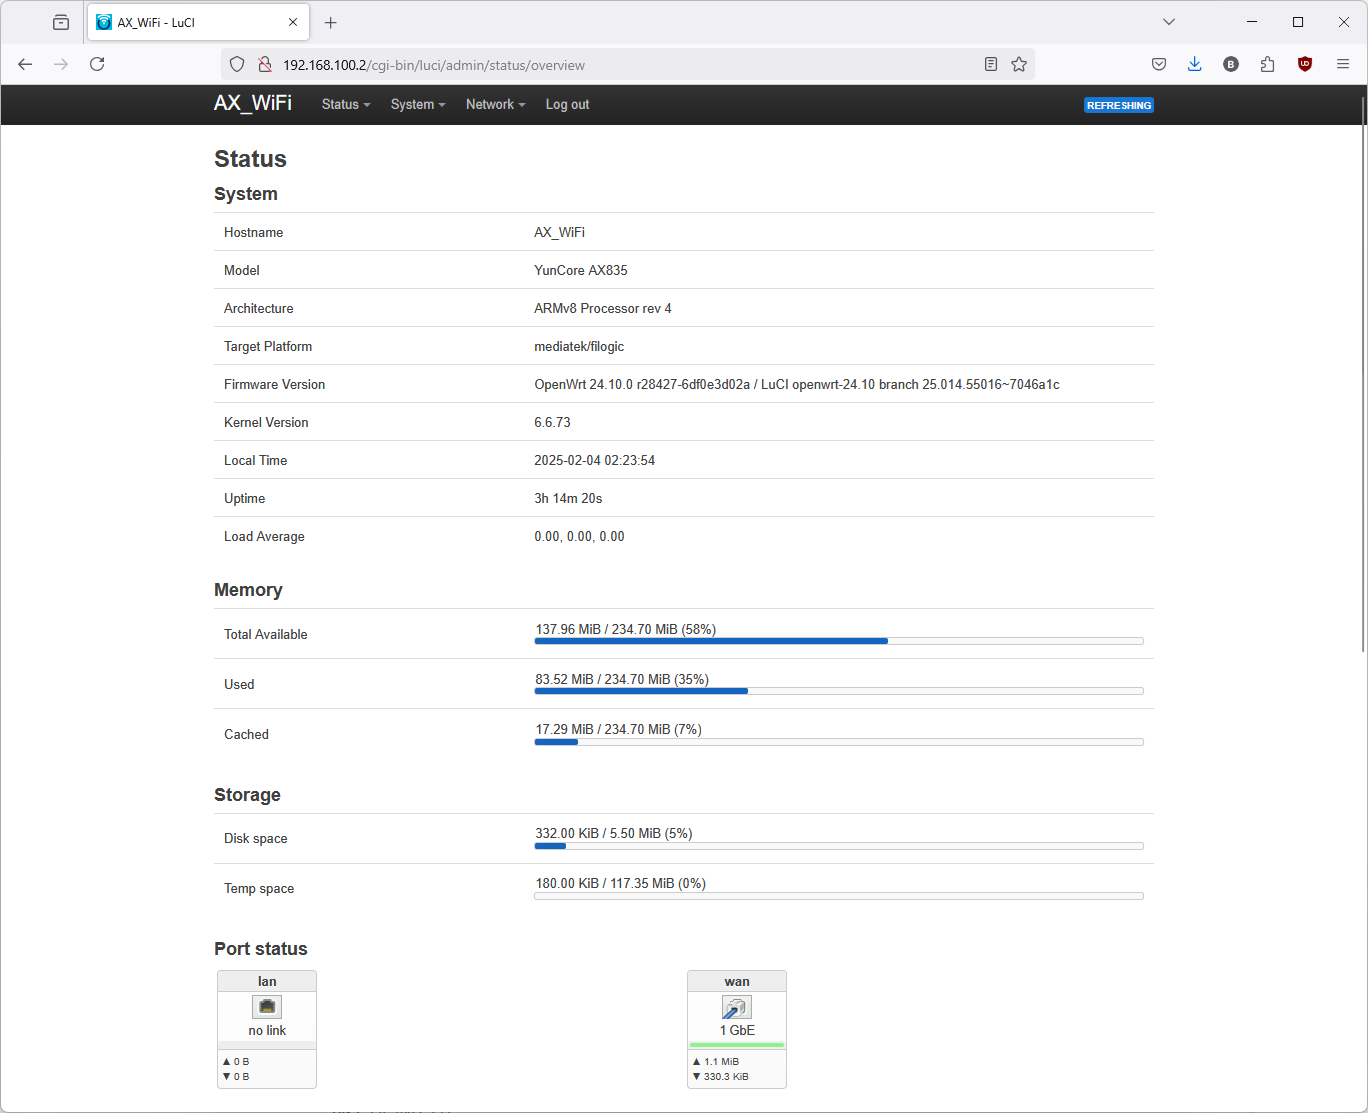
This should make the rest of the setup a lot simpler than command line. Let's proceed with the Wifi setup.
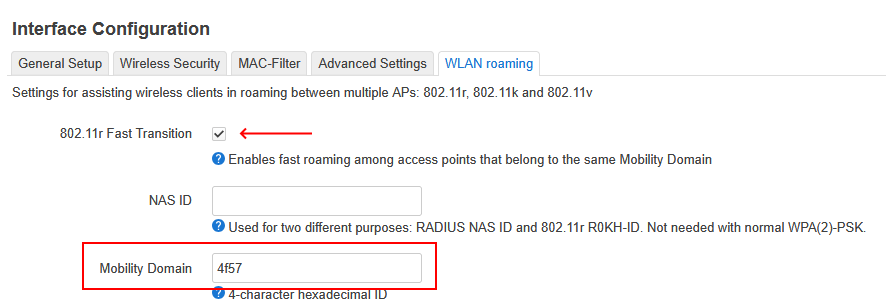
802.11r Fast Transition
For seamless roaming between access points:
- On your main router, enable 802.11r Fast Transition under the wireless settings
- Set a mobility domain code (the value doesn't matter, but must be consistent across all APs)
- Apply the same settings on your YunCore access point through the LuCI interface
Channel Selection for Multiple Access Points
One of OpenWRT's advantages is fine-tuned control over your wireless settings. To prevent interference:
- Configure your main router and access points to use different, non-overlapping channels
- Use a tool like inSSIDer to verify that your access points aren't causing interference with each other
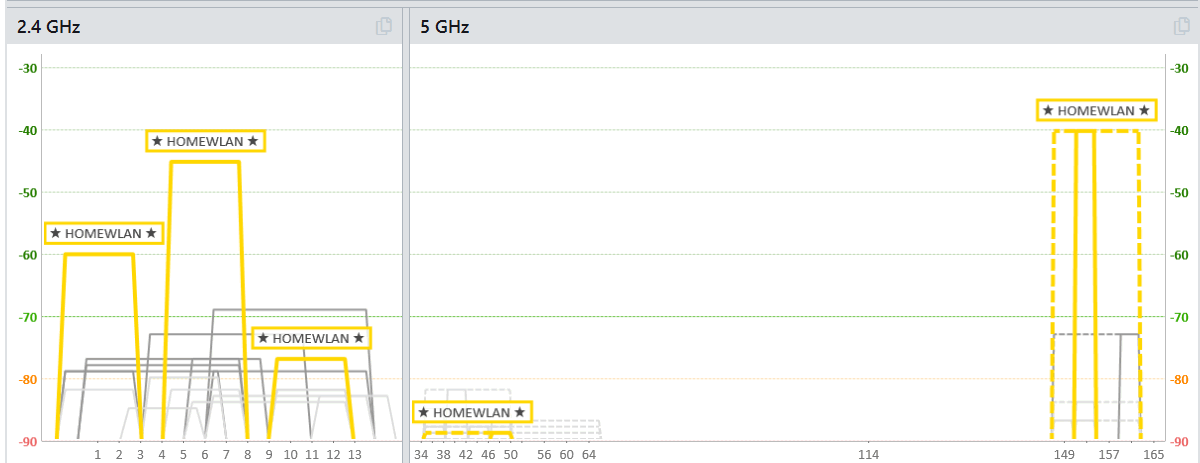
This optimization ensures your devices will transition smoothly between access points based on signal strength.
Conclusion
With these steps completed, you now have a powerful, affordable Wi-Fi 6 access point running OpenWRT. This setup extends your network coverage while maintaining seamless connectivity as devices move throughout your space.